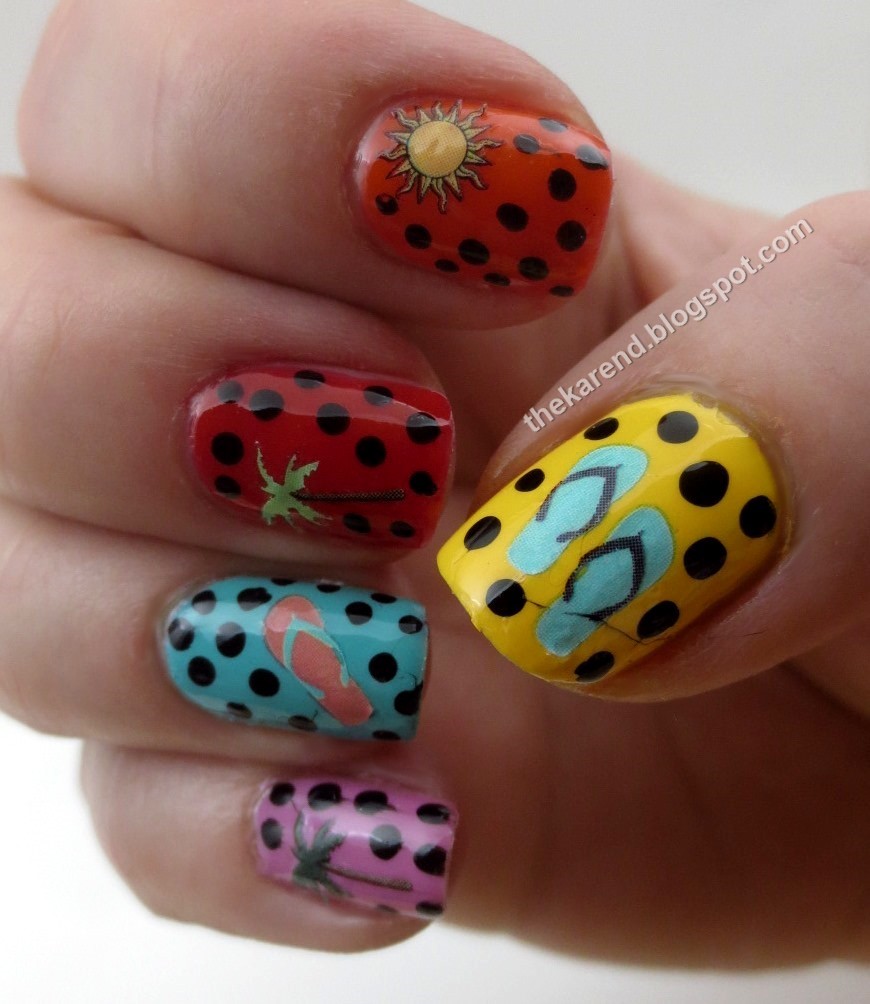
It was a full mani, too; here's my reclusive right hand:
I took the color scheme and dots idea from this shirt I got at Rainbow, a store where it feels like at least 90% of the merchandise is aimed at people who are not me but I still go into because sometimes they have very fun stuff in my size, like this shirt.

I'd originally planned to just copy the dotticure outright, wear it and the shirt to meet up with some of my nail polish friends at IKEA and do my beach mani later, but then I noticed the palm trees on the shirt and remembered some nail stickers I'd gotten at Five Below, the Tropical Smoothie set.

To pick the base colors, I took the shirt over to the Helmers that have the creme polishes sorted and waiting to be put on nail wheels and just pulled bottles out until I found shades that looked close to the ones on the shirt. The final product lineup for this mani (even without the stickers) was too big to fit into my lightbox comfortably. Left to right: Qtica Natural Nail Growth Stimulator (which I found on clearance and have been alternating with Duri Rejuvacote), my old favorite Salon Sciences Instant Artificials, Funky Fingers Alex's Lemonade (2014 version), Sally Hansen Xtreme Wear Red Rebel (it's a rebel because it's actually orange), L'Oreal Red Robin (oh how I love my old L'Oreals), Sally Hansen Triple Shine Dive In, Sally Hansen Xtreme Wear Pink of Punch, and Diamond Dry (which has become my go to quick dry topcoat, so that's probably why Sally Hansen hasn't yet discontinued the Insta Dri one in the red bottle—they know I won't be sad like I was when they yanked the Age Correct base before I'd found something I liked better).

I was so excited to get to the arty part that I completely failed to write down any notes about how many coats of the creme base colors I used. I think it was three for the orange and red and two for the others, but I've really no idea.

And here's how much I love my sensitive-nosed husband: I painted this mani standing up on our back patio, using our electric meter as a shelf for my bottles.

The stickers went on next. I really should have waited a bit longer for the base to dry; I slicked on a layer of Diamond Dry to speed the process but even that wasn't fast enough for me. Some of the decals wrinkled ever so slightly as the layers underneath completely dried, but it wasn't too noticeable.

Some dots with Wet 'n' Wild Black Creme and another layer of topcoat and I had a mani to match my shirt.

One last check in the car before I headed in to meet up with the ladies at IKEA—looks like I need some cuticle cream:

The ladies and I (and two patient husbands and one adorable little daughter) gathered in the IKEA cafe for some sustenance before we headed out to trek through the store inspecting items for their suitability for use in our nail polish hobby. I'd brought one of my tallest bottles (Bourjois 1 seconde) and a standard size (Orly, same height as OPI and China Glaze and so many others) to try out in various drawers and such.

Along the way, we looked at Helmers (they come in orange and green now!) and Alexes in all their many configurations and carts and shelves and cabinets whose names I do not know. We looked at lamps and mats and containers and chairs. We took a wrong turn and missed a whole section and had to backtrack. We temporarily lost one of the husbands near the end of the maze before the cash registers. After all that, we posed for a group shot with the cinnamon rolls that they stragetically place by the exit to snare tired and hungry shoppers. Clockwise starting from my hand in the lower right, it's @jamylyn_nails (who has just moved to Michigan and doesn't have her stash yet, so she can't do the all the crazy great manis she usually does, which is why I've given her MS Paint star Skittles), @traceyloveslacquer, @honeybee_nails, and @paintmewithpolish.

I had such fun hanging out with these ladies, and also fun doing the HPB challenge again. Click through the links at the bottom of this post to see what the other bloggers participated did for their beach/ocean manis (links will continue to be added for the next week).